or Call Us at 1-800-776-2228
or Call Us at 1-800-776-2228
I rarely decorate for the holidays. I typically throw up a little Charlie Brown tree and "holiday decorating" gets quickly checked off the to-do list. Since I don't have a lot of space for a real tree (and admit it – a real tree would look ridiculous in the garage!), this space-saving, wall mounted Christmas tree is perfect for cozying up a wall for the holidays!
Here's how to make it.

TruTac™ Light Duty Forward Action Stapler

Cut out planks of 1/4″ plywood and draw a triangle. The planks can be any width you’d like them to be; there’s no right or wrong answer here. I made mine about 7.5″ wide. Placing them on a 2″x 2″ board, I needed four planks. Using a straight edge, I drew a triangle in the shape of a tree, from top to corner on each side.
Cut out planks of 1/4″ plywood and draw a triangle. The planks can be any width you’d like them to be; there’s no right or wrong answer here. I made mine about 7.5″ wide. Placing them on a 2″x 2″ board, I needed four planks. Using a straight edge, I drew a triangle in the shape of a tree, from top to corner on each side.
Cut out the tree. Using a jigsaw, cut out the tree on the lines you just drew with the straight edge.
Cut out the tree. Using a jigsaw, cut out the tree on the lines you just drew with the straight edge.
Drill holes for the lights and secure the boards. Use a sacrificial board underneath so you don’t drill a hole in your table. Plus, it helps to prevent tear-out on the reverse side when you use a sacrificial board. I tried to make the holes evenly spaced.
Drill holes for the lights and secure the boards. Use a sacrificial board underneath so you don’t drill a hole in your table. Plus, it helps to prevent tear-out on the reverse side when you use a sacrificial board. I tried to make the holes evenly spaced.
Paint your tree! You can secure the boards to the 2″ x 2″ at this point with glue, brad nails or staples. I chose to paint the boards first, but it’s best to secure them in case you want to disguise the staples or nail holes. Painting is the fun part! I didn’t have any green paint, so I mixed a yellow and blue together, and made my own green. Then I added some white and created an ombre effect to make it more interesting! I used dark wood stain to create the trunk of the tree since I didn’t have any brown paint!
Paint your tree! You can secure the boards to the 2″ x 2″ at this point with glue, brad nails or staples. I chose to paint the boards first, but it’s best to secure them in case you want to disguise the staples or nail holes. Painting is the fun part! I didn’t have any green paint, so I mixed a yellow and blue together, and made my own green. Then I added some white and created an ombre effect to make it more interesting! I used dark wood stain to create the trunk of the tree since I didn’t have any brown paint!
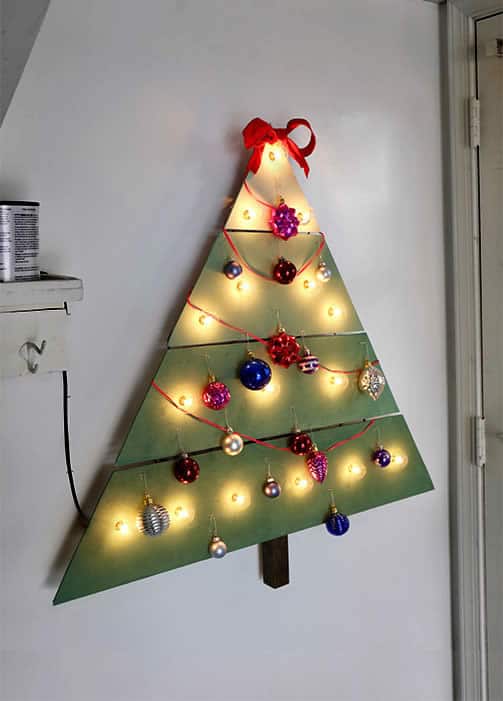
Screw in the lights. I bought the lights from the thrift store months ago and held on to them, knowing a great project would come along. They’re indoor/outdoor lights. The only way this really works is to use thin wood so that the light bulb and the socket make a connection; they’ll turn on when plugged in. Just don’t screw them too tightly or they’ll crack!
Screw in the lights. I bought the lights from the thrift store months ago and held on to them, knowing a great project would come along. They’re indoor/outdoor lights. The only way this really works is to use thin wood so that the light bulb and the socket make a connection; they’ll turn on when plugged in. Just don’t screw them too tightly or they’ll crack!
Staple the bulky wires to the back of the wall-mounted Christmas tree. This tree is getting hung on my garage wall, so there wasn’t space for all that bulky leftover electrical just hanging there. The Arrow Fastener TruTac was the perfect tool to secure it in place. It’s pretty lightweight and allows you to push it in versus squeezing it (if you’ve got small hands or can’t handle bulky staplers, this one is for you).
I just had to be careful I didn’t put a staple through the cord! GASP!
Now that the cord wasn’t in the way, I could attach the D-ring and hang the picture hanger on the wall (Don’t mind the ugly back of the tree! This was scrap wood I was using!)
Now that the cord wasn’t in the way, I could attach the D-ring and hang the picture hanger on the wall (Don’t mind the ugly back of the tree! This was scrap wood I was using!)
These lights had a super long cord that I didn’t want just hanging around at the bottom. So, I used the stapler to snake it up the wall and neatly hid the excess stapled cord behind cans of paint, then plugged it in.
These lights had a super long cord that I didn’t want just hanging around at the bottom. So, I used the stapler to snake it up the wall and neatly hid the excess stapled cord behind cans of paint, then plugged it in.
The DIY wall-mounted Christmas tree looked a little plain with just lights, so I used the stapler to create “hooks.” The trick to this was to not press the TruTac™ stapler all the way against the wood. If I left a little space between the wood and the stapler, the staples wouldn’t go in all the way and I could place them randomly on the tree and hang Christmas ornaments off of them! I also added a bow and some other ribbon for trimmings!
The DIY wall-mounted Christmas tree looked a little plain with just lights, so I used the stapler to create “hooks.” The trick to this was to not press the TruTac™ stapler all the way against the wood. If I left a little space between the wood and the stapler, the staples wouldn’t go in all the way and I could place them randomly on the tree and hang Christmas ornaments off of them! I also added a bow and some other ribbon for trimmings!
I love how it looks at night!
Get Arrow tips, tricks, projects and promos in your inbox!
Hey there! We’ve updated our Privacy and Cookie Policies at the request of some of our friends in Europe. Click Accept to let us know you’re okay with the updates. Thanks!
View Cookie Policy Accept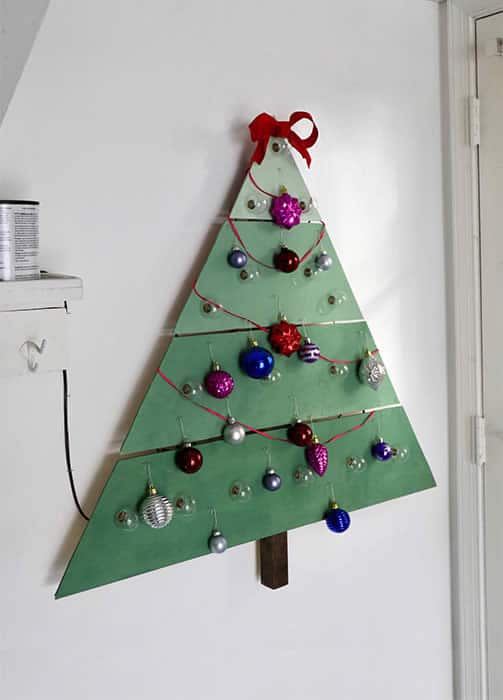