or Call Us at 1-800-776-2228
or Call Us at 1-800-776-2228
I'm sharing with you how to make your own craft apron using some of my favorite Arrow Fastener tools. It's a fun, inexpensive project to create. Plus, it makes a nice gift. Let's jump right into it!
To make your own craft apron, you’ll need to cut the front part, the sizes of pockets you’ll want, and any decorative edges or bias tape you’ll want on your waistband, pockets, etc.
Measure your hips from side to side and then add about 2″ to that measurement to account for seam allowances.
To make your own craft apron, you’ll need to cut the front part, the sizes of pockets you’ll want, and any decorative edges or bias tape you’ll want on your waistband, pockets, etc.
Measure your hips from side to side and then add about 2″ to that measurement to account for seam allowances.
With right sides together, sew the apron body and waistband together with a ⅝” seam allowance. Press the seam with an iron.
With right sides together, sew the apron body and waistband together with a ⅝” seam allowance. Press the seam with an iron.
How you design your pockets will be up to you! You can use any sizes you’d like. Think about the craft tools that you’re most likely to use and create pockets precisely for what you’ll need to keep close at hand, such as scissors, pencils and a small notebook.
Keep in mind, you’ll need at least ½” for a seam allowance all around the pocket. It’s easier to prep the pockets by folding under the seams and pressing them down with an iron.
If you’re adding complementary bias binding, which wraps over the top edge of a fabric to finish off the edge, sew the bias tape to the top of the pocket first before folding under the side and bottom seams.
Pin the pockets to where you’ll want them to be on the apron and then sew the pockets to the apron using topstitching. I liked using two rows of topstitching for extra reinforcement and for decorative purposes. Make sure the pockets are spaced properly from the edges of the apron.
Pin the pockets to where you’ll want them to be on the apron and then sew the pockets to the apron using topstitching. I liked using two rows of topstitching for extra reinforcement and for decorative purposes. Make sure the pockets are spaced properly from the edges of the apron.
Once the pockets have been added, it’s now time to fold under the side seams of the DIY apron and press with an iron. My seam allowances were ½”, doubled over to encase the frayed endings of the fabric. Therefore, the true seam allowance was 1” total on each side.
Once the pockets have been added, it’s now time to fold under the side seams of the DIY apron and press with an iron. My seam allowances were ½”, doubled over to encase the frayed endings of the fabric. Therefore, the true seam allowance was 1” total on each side.
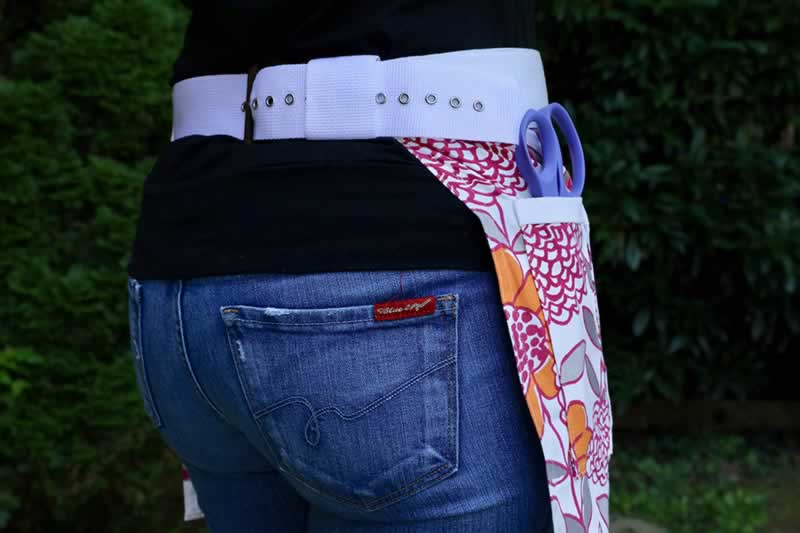
A long piece of webbing gives structure to the waistband and allows the apron to be belted.
First, you’ll need to create a small belt loop for the excess webbing when the belt is adjusted. To create this, cut a small piece of webbing about 5” wide. Make a loop and secure it with an Arrow Fastener stapler or hot glue.
With the apron right-side down, place the webbing on the waistband. Thread the webbing through the loop you just created, then thread the end of the webbing up through the end of the belt buckle. Pull the webbing through about 5". Pull the waistband down over the webbing, tucking it under the webbing and pinning it into place.
A long piece of webbing gives structure to the waistband and allows the apron to be belted.
First, you’ll need to create a small belt loop for the excess webbing when the belt is adjusted. To create this, cut a small piece of webbing about 5” wide. Make a loop and secure it with an Arrow Fastener stapler or hot glue.
This step can be a little tricky because the webbing likes to shift. In hindsight, I recommend securing the webbing to the waistband with either small dots of hot glue or a bit of spray adhesive. Less sliding means your stitches will capture the edge of the webbing, securing it into place.
Once the webbing is securely in place, I sewed it into place, first using a topstitch on the top edge of the waistband.
Then, sew another row of topstitching at the bottom edge of the waistband. Both rows of topstitching helped to secure the webbing in place. I also sewed along the sides of the webbing with two rows for extra reinforcement.
This step can be a little tricky because the webbing likes to shift. In hindsight, I recommend securing the webbing to the waistband with either small dots of hot glue or a bit of spray adhesive. Less sliding means your stitches will capture the edge of the webbing, securing it into place.
Once the webbing is securely in place, I sewed it into place, first using a topstitch on the top edge of the waistband.
I wasn’t sure I was going to add this piece to the DIY craft apron, but at the end of the project, I decided to attach it. I think it helps to balance out the look of the apron. Using a piece of fabric the width of the apron and about 3” thick, with right sides together, I sewed a piece of fabric to the bottom. I pressed the seam, and then added a hem and more topstitching.
I wasn’t sure I was going to add this piece to the DIY craft apron, but at the end of the project, I decided to attach it. I think it helps to balance out the look of the apron. Using a piece of fabric the width of the apron and about 3” thick, with right sides together, I sewed a piece of fabric to the bottom. I pressed the seam, and then added a hem and more topstitching.
Depending on how big your waist is, you can add as few or as many eyelets as you want to truly make this DIY apron customizable.
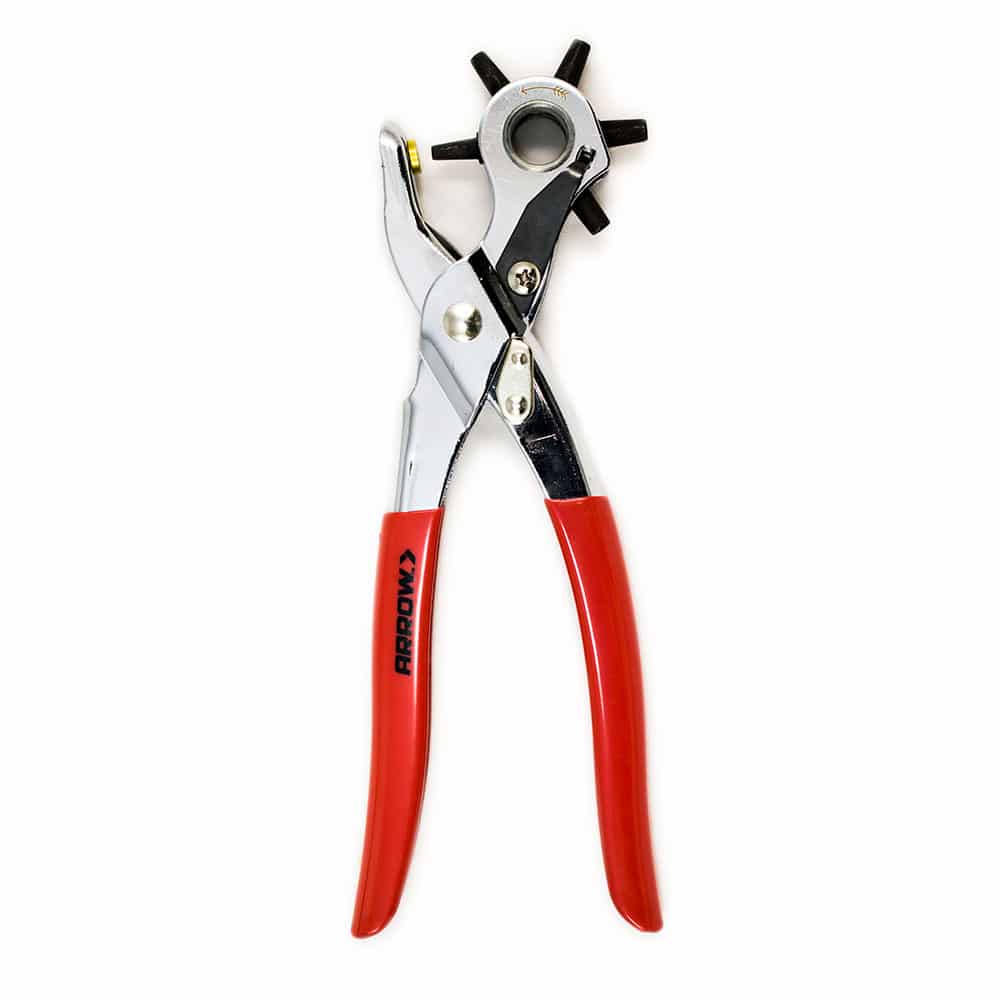
First, I marked where I wanted my eyelets to be, spacing them ⅝” apart, using a marker. Then, I used the Arrow Fastener revolving hole punch to place the holes. I recommend doing a sample piece of webbing first so you don’t ruin the webbing that you just sewed into your apron! Once you’ve mastered the holes and know which size works best for the eyelets, you can mark and hole punch your webbing.
Depending on how big your waist is, you can add as few or as many eyelets as you want to truly make this DIY apron customizable.
First, I marked where I wanted my eyelets to be, spacing them ⅝” apart, using a marker. Then, I used the Arrow Fastener revolving hole punch to place the holes. I recommend doing a sample piece of webbing first so you don’t ruin the webbing that you just sewed into your apron! Once you’ve mastered the holes and know which size works best for the eyelets, you can mark and hole punch your webbing.
Insert the eyelets into the holes.
Turn the webbing over and make sure the fibers are not in the way of the eyelet. It should be completely exposed.
Flip the webbing over to the “right” side. With the pointy end facing up, slide the webbing in between the eyelet tool, with the pointy prong coming up through the backside of the eyelet. Squeeze tightly.
The eyelets should look clean on the “right” side. On the back side, the edges of the eyelet should fold over the fibers, holding the eyelet in place.
Insert the eyelets into the holes.
Now you know how to make your own craft apron! Whether you need to carry scissors, pens, pencils, rulers – you name it – this craft apron is perfect for keeping all of your important accessories close to you when working on projects! The adjustable belt makes it perfect for you or friends and family members of all sizes!
Get Arrow tips, tricks, projects and promos in your inbox!
Hey there! We’ve updated our Privacy and Cookie Policies at the request of some of our friends in Europe. Click Accept to let us know you’re okay with the updates. Thanks!
View Cookie Policy Accept